My Original Handbag Tutorial
I am in the process of building up my shops again, after being on an extended emergency leave. Shops are a full time job to keep up and when we also make the items we sell, i'ts double time. I love to create, as long as there are enough hours in the day ... and night.Find my bags on Aftfire: ElizabethCreations
and Etsy: ElizabethCreations
I am posting a broad tutorial for my original handbags. This is the main ingredients to make one, but there are other little ways to make these bags special but I can't add all of it the first time around... it would just make it difficult and confusing to begin with.
So if there are any questions, you can ask and I'll answer. This is the first time I've attempted to do one of these lengthy tutorials, so I hope I haven't left something important out.
I apologize that this is a black purse, but these pictures were taken a couple of years ago and I don't have time to do all this again. I'm not adding the amount of fabric you'd need, because you can design your purse and make it the size you like, and figure out what you need.
So.. go for it! Give it a try....
Press the Pellon Fleece to the wrong side of the foundation pieces, sprinkling water to the fleece with a spray bottle and use pressing cloth to make sure all of the fleece is glued well to the foundation pieces.
I add extra pieces of either Craft Fuse or Deco Bond to the Pellon Fleece after the Fleece is sufficiently fastened to the black foundation. Pic 2 shows where and about how wide a piece. It just serves for stability.
3-4
3-4 If you are adding pockets, cut the pocket and pocket lining pieces. Decide how deep you want the outside pockets to be and cut accordingly. Cut Pellon Fleece Inferfacing for each outside pocket and iron it to the front pocket section just as you did the main purse. Fix 2 pocket on both sides, (if desired) and sew them together, finish the top and bottom, and turn right side out. They are ready to sew to the foundation pieces.5. You can sew the bottom of the pockets to the purse now if you like, but just sew that much for now, as you have to apply the straps first. (you can use webbing for straps, or make your own) Either use D Rings and then attach the straps to the other end of the D Rings after you finish the bag, or if not using the D Rings, sew the whole strap to the purse now. I like a 12" strap drop length for shoulder carry, but use whatever you like and make your straps accordingly. (I cut the strap fabric 4" wide and add Pellon Fleece that is cut to 2" wide, press the fleece to the fabric, and fold all to make a 1" wide strap. Press and sew down both sides and in the middle. (I lightened the black fabric in #5 so you could see the strap.) You don't have to make them that long, as the pocket covers the bottom half of the straps.
6. If you are satisfied with it all, sew the pockets into pocket sections and the sewing usually goes on the inside of where the straps are lined up. Make sure you sew the lines straight.
7. Add the zipper (I am assuming if you are
attempting this, you are
experienced zipper sewers, so I’m not
adding zipper instructions except to say a regular zipper
works fine, and the zippers you can find in the upholstery
section of JoAnn’s that come in a roll, are super nice.. They come
in black and Beige.. Not sure what other colors.
8. Make the purse lining the same size as the purse
foundation. If you want pockets inside,
make them the size of your choice, as the picture to the left shows.
9. I like to put a 2”
strip to the top of the lining so it shows instead of the lining, but if you
want your lining to show, then skip the extra piece. Add a lite to medium
weight interfacing to the middle part of the lining, so the pockets have
something to ‘hang’ on. (not a must
however). You can add Pellon Fleece Interfacing to the pockets , as it makes
for a nice pocket to keep all things.
10-11 Shows the inside of purse with zipper
added. Sew the lining pieces to the
zipper in the same fashion. Press both
sides and carefully making sure the lining
is in place in the back, sew close to the zipper
on the right side of the foundation purse..
At this point, make sure the purse piece and
lining pieces are straight.. ..shape up the sides, trim anywhere necessary so it all is even and straight.
fabric… you can
break needles doing this last sewing).
If you added a little fabric to each end of the zipper, it helps when
sewing the purse together when you don’t have to sew over the actual
zipper. Start sewing a few inches in, at
the bottom of zipper, leaving a wide opening at lining bottom. Starting about 3 inches in, at bottom of
lining, sew up the side, over the zipper part, down the side, across the bottom
of the foundation purse, up the side and
down the lining side back to about 3 inches in on that side also. I’m sorry I don’t have pictures of the above….
But I’m sure you can do a great job with it.
13 shows the bottom of the purse. Gather up the bottom sides and measure across
that part, about 3-4 inches, mark it across and sew across on the mark.
Cut the excess off. Do the same with the lining.
Now reach through the zipper and pull the purse
right side out. Try to not wrinkle it any
more than you have to. Straighten it smooth
it out… fix the sides of the zipper where you have to work with it to get it
all even like you want it. You can use a pick but be EXTREMELY careful you don’t
tear the fabric after going this far.
You can
add a covered cardboard insert in the bottom.
And add the rest of the straps to the D Rings.. That is difficult to
maneuver In the machine, but you can do it!
The last picture is the finished product! Have fun and practice makes perfect!
___________-_________________________________________-
HOW TO MAKE T-SHIRTS WHITE AGAIN
How to make those dingy white T-Shirts white again:
Add bleach and dish washer detergent in a large kettle of water. Heat on the stove 'till the water is hot enough to dissolve the detergent .. almost to a boiling point ... stirring every few minutes. Add the T-Shirts to the bleach/detergent/water solution and stir them around every few minutes. Turn off the heat and let the T-Shirts soak for an hour or so.... stirring now and then.
After the soaking, take the shirts out of the water (I use a wooden spoon) and put in washer to do a regular wash cycle.
You can reuse the water solution for more T-Shirts.
Don't do this to anything you wouldn't want bleached.
__________________________________________________________________________
____________________________________________________________________
How To Make A Small FastStitch Pouch/Bag
How to Make a Small Fast Stitch Pouch/Bag

1 10 x 6 Inch Outside Fabric
1 10 x 6.5 Inch Pellon Fleece Interfacing
1  10 x 6.5 Inch Lining Fabric
1 Snap or Velcro Piece or Your choice of fastener


Lay outside fabric piece on Pellon Fleece Interfacing
Press/Iron to adhere the 2 pieces together
Lay the Lining Fabric Piece on top of the Pellon Fleece Interfacing you
just joined,and press it smooth
Now trim around the 4 sides to make sure the 3 layers are even on all
sides.
Pin to keep it even, and then sew all around the 4 sides, 1/8 inch in
from the edge
Again, press all layers making sure they are all even

Next, sew a zigzag stitch all around the 4 corners to enclose the
bare edges.
You can use a matching thread or a contrasting thread.
Contrasting thread will show every little error, but the contrast is interesting...
  just use your own ideas on finishing
After you have zigzagged all around, press again and fold the bottom 1/3 or so up to
within 2-3 inches from the top, making sure all sides are even.
At this point you can add half of what you are going to use as a fastener. …
a snap, velcro, magnetic snap... whatever you decide to use... put the one half
on before you sew the folded piece.

Now you are ready to sew the folded piece to make the pocket.  Making sure all
sides are even, sew a straight stitch down both sides, securing the ends with back stitch.
Again, press and fold down the remaining top 2-3 inches of the top, over the pocket to make the closure piece.
Sew the other half of the fastener you are using onto the top part and fasten to
make sure you are pleased with it so far.
Next you can add a button over the snap/velcro/etc... to add a little pizzaz...
  And you are done!  Congrats... now you can use your talent and ideas to add special
stuff to this bag.. just to make it personal and extra special.
   You can use most any size of fabric to make this any size... experiment and enjoy!!
____________________________________________________________________
How To Turn a JPG into a Transparency (png) File
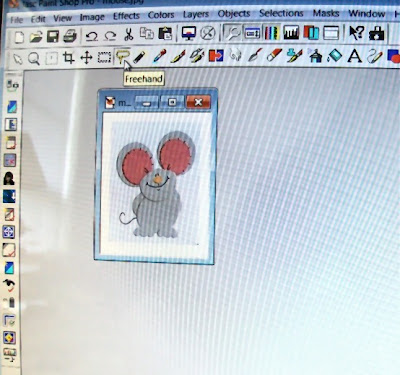
Your graphic needs to be a simple picture (to begin, and then you can tweak the harder ones later) without a lot of background and the background should be lighter than the graphic itself. (you can deal with darker backgrounds after you learn these steps).
With the lasso tool, draw around the image.
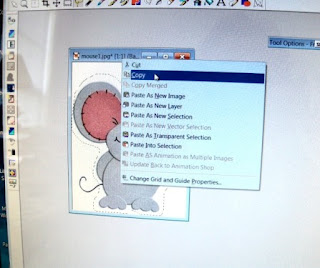
Click on the top of the picture and choose “copy”
Put your mouse anywhere next to this graphic and click … then click on “paste as new image”

With the magic wand tool, click on the edge of the part you want to remove around the image.

Under the “edit” option, Click on “cut” or “clear” to remove the background you have just circled. If you don’t get it all the first time, click again on the part that is left and do the same thing.
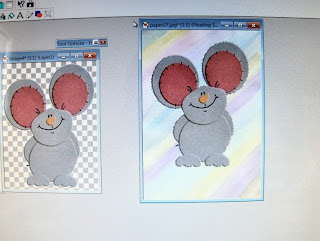
You should have a clean transparency.
With the lasso tool, click on the picture and it will remove the lines around the figure. Do not merge the layers or you will add a background onto the graphic.
Save your new transparency as a “png” file. You can now paste this onto any type background.
This transparency has been copied and pasted onto the new background.
This won’t work on a gif file.. if you want to do a gif, you have to first save it as a jpg and then take these steps I’ve outlined here.
__________________________________________________________________________
__________________________________________________________________________

Handmade Box:
To make the Lid:
Measure and draw the lines of the size box you want.
Example: 3” square box, 1.5” high
Cut a 3” square from card stock
Lay it on card stock sheet and add 1.5” (exactly) on all 4 sides
Cut out.
Lay ruler down with 1.5” allowance on the right side
Score down that line
Do this on all 4 sides
Cut into 2 sides
Fold up all 4 sides
Glue/paste on the flaps
Secure to the wall of box
Do the same procedure to the lid, except make the height ¾ inch instead of 1 1/2”
Do the sizing exact for both box and lid… and the lid will fit perfectly
Use decorated scrapbooking card stock or plain cardstock.
These boxes are sturdy enough for a lot of things… they are not heavy like cardboard.
I’ve used poster board for these, but the sizing is more difficult because of the thickness.
_____________________________________________________________________


No comments:
Post a Comment